Do you have any questions about adding push notifications to your WordPress website? Users can receive messages from you via WordPress push notification even if they are not currently on your website. By doing this, you can improve visitors to your website and your revenue.
This post will demonstrate how to add web push alerts to your WordPress website quickly and efficiently.
What Do Push Notifications Consist Of?
On consumers’ desktops or mobile devices, push notifications show up as brief, clickable popup messages.
On a desktop or in the notification area of a mobile device, they are visible. The fact that they can be displayed even when the user’s browser is closed is the nicest part.
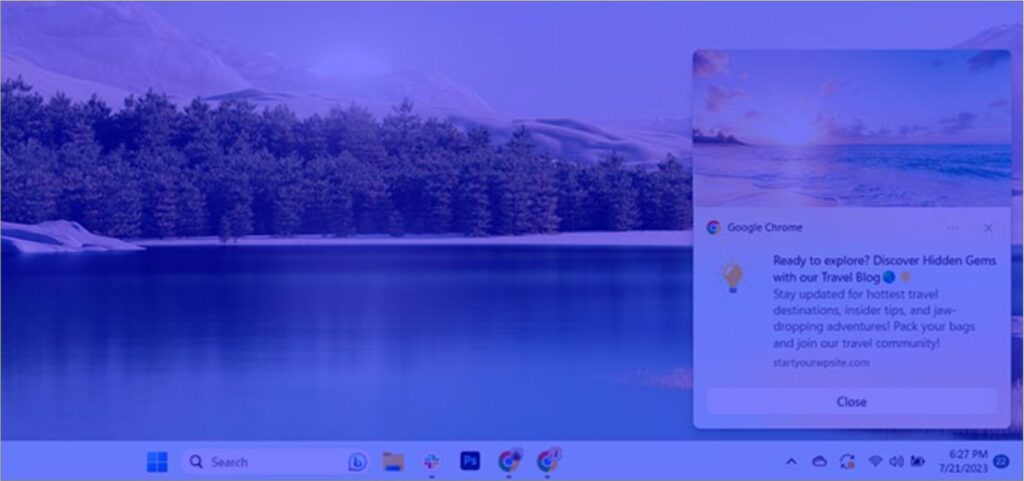
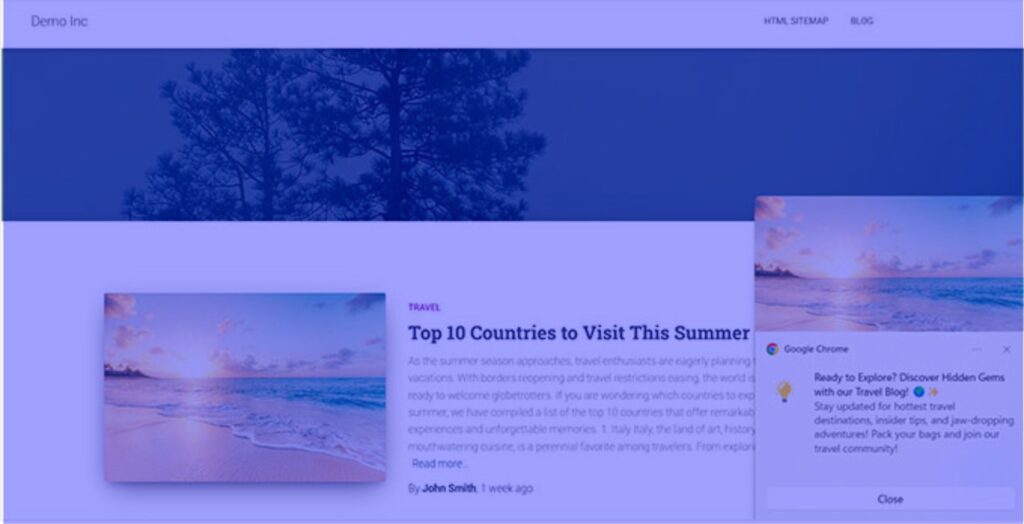
A push notification sample is provided below.
Push notifications are a powerful tool for turning website visitors into devoted followers and customers since they enable you to contact consumers across devices with your most recent information and promotions
Why Should Your WordPress Site Use Web Push Notifications?
Did you know that 70% of visitors to your website never return? This is why you need to turn those visitors entering your WordPress website into subscribers and buyers.
This can be achieved by simultaneously employing several channels. These might include web push notifications, social media, mobile or SMS marketing, and email marketing.
With 51% of consumers preferring to be engaged by firms via email, email lists remain the most effective marketing resources. We are discovering, though, that push alerts are also quite useful.
Push notifications are an effective marketing technique for the following reasons, to name a few:
- This can be achieved by simultaneously employing several channels. These might include web push notifications, social media, mobile or SMS marketing, and email marketing.
- With 51% of consumers preferring to be engaged by firms via email, email lists remain the most effective marketing resources. We are discovering, though, that push alerts are also quite useful.
- Push notifications are an effective marketing technique for the following reasons, to name a few:
Popular websites are already utilizing web push notifications as a marketing tactic, including Facebook, Pinterest, LinkedIn, and many others.
Compared to emails, push notifications have a 14X higher click rate and a 10X higher open rate. They are more interesting than social networking sites, SMS, and email marketing.
After that, let’s examine the simple process for including web push alerts on a WordPress website.
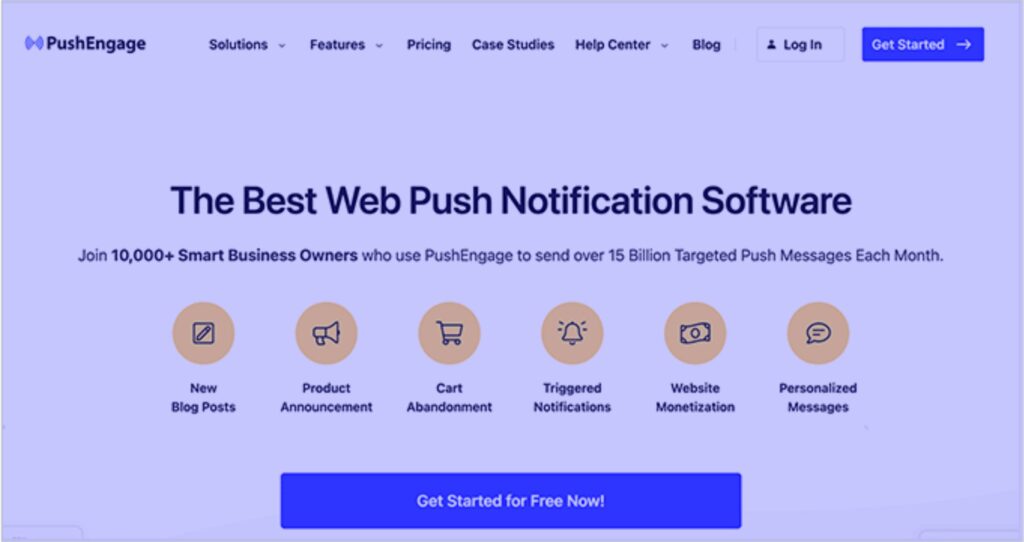
WordPress Web Push Notifications Setup Using PushEngage
The best push notification service available on the market, PushEngage, makes it simple to add push alerts to your WordPress website.
Using tailored push notifications, you may continue to communicate with visitors even after they leave your website.
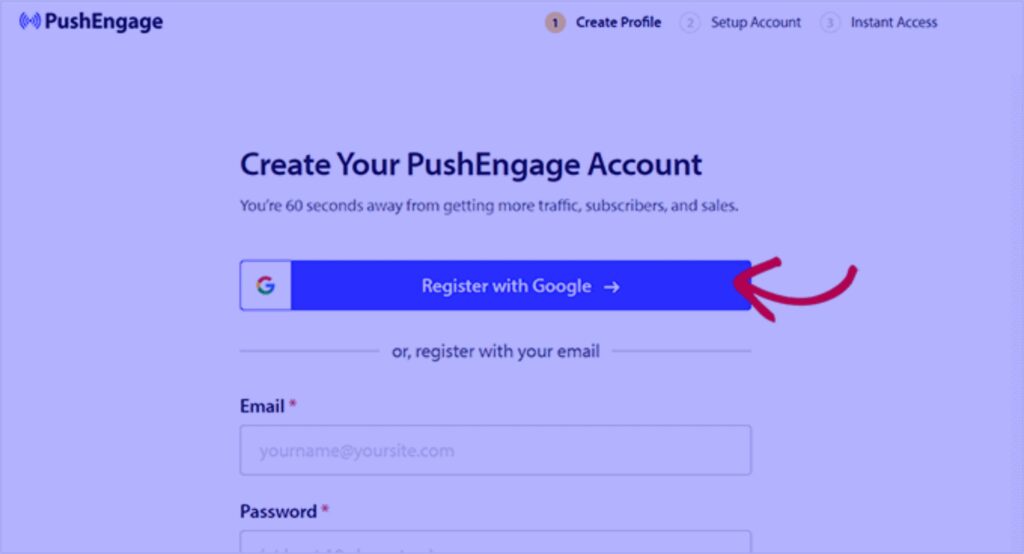
Step 1: Creating Your PushEngage Account
To get started for free, you must first visit the PushEngage website and select the ‘Get Started For Free Now’ button.
Up to 200 subscribers and 30 notification campaigns are included in the free plan each month. As you gain more subscribers and send more campaigns, you will need to upgrade.
You must set up a PushEngage account after choosing a price option. To register or set up a new account, you can use your current Google account.
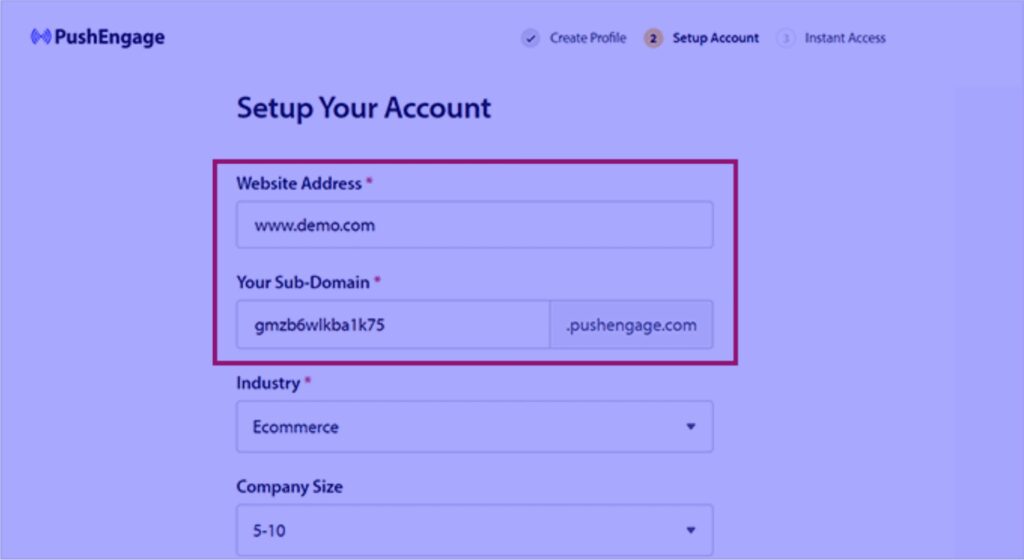
Upon doing so, you will be directed to the ‘Setup Your Account’ page, where you must enter the domain of your website, your company’s industry, and its size.
This information will be used to automatically create your subdomain. You will then need to enter your payment card information here.
You will be directed to your PushEngage dashboard after registering.
Remember that you will need to enter your website information here if you registered using your Google account.
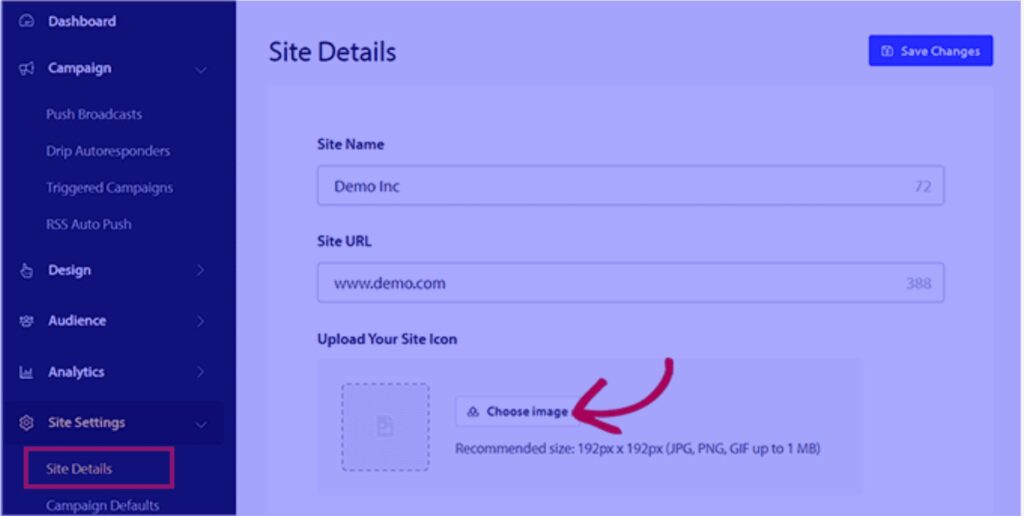
Once you’ve finished, go to the Site Settings » Site Details page in the PushEngage dashboard’s left column.
If necessary, you can change your site’s name and URL from this point. As a site symbol for your online push alerts, you then myst upload an image.
The ‘Choose Image’ button must be clicked to accomplish this.
Your screen will next display a dialog where you can upload an image from your PC.
An image’s URL can also be used to add it. Simply select an image and then click the “Use” button.
Don’t forget to click the ‘Save Changes’ button to save your settings after that.
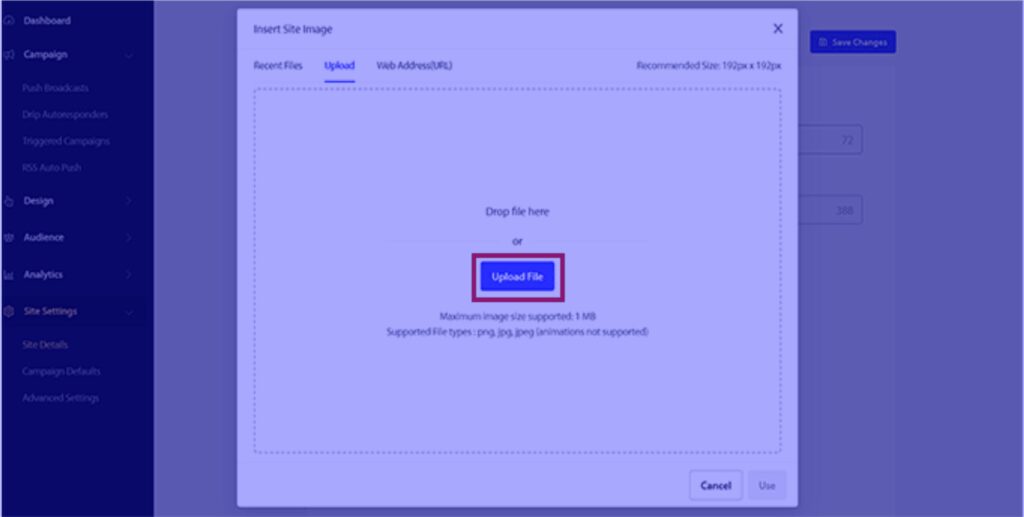
Keep in mind that the suggested size for your image is 192×192 and that it must be in the PNG or JPG file format.
The necessary details for your PushEngage account are now complete.
Step 2: Integrating PushEngage With Your WordPress Website
Connecting your WordPress website to PushEngage is the following process.
You must install and activate the PushEngage WordPress plugin in order to accomplish this. See our step-by-step tutorial on installing a WordPress plugin for more information.
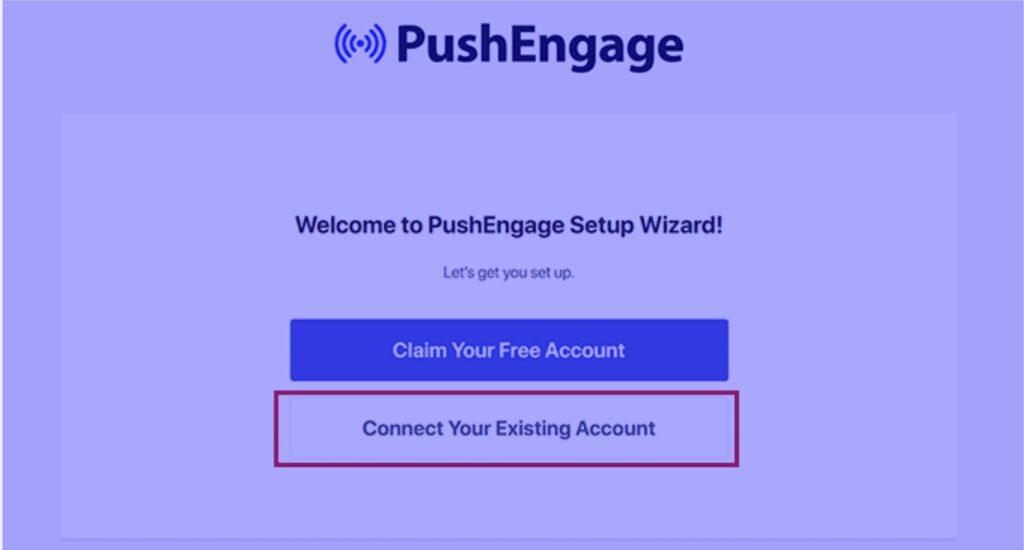
You must select the ‘Connect Your Existing Account’ option on the ‘Welcome to PushEngage Setup Wizard!’ window that appears on your screen after activation.
Also Read: Top 7 Multi-Currency WordPress Plugins
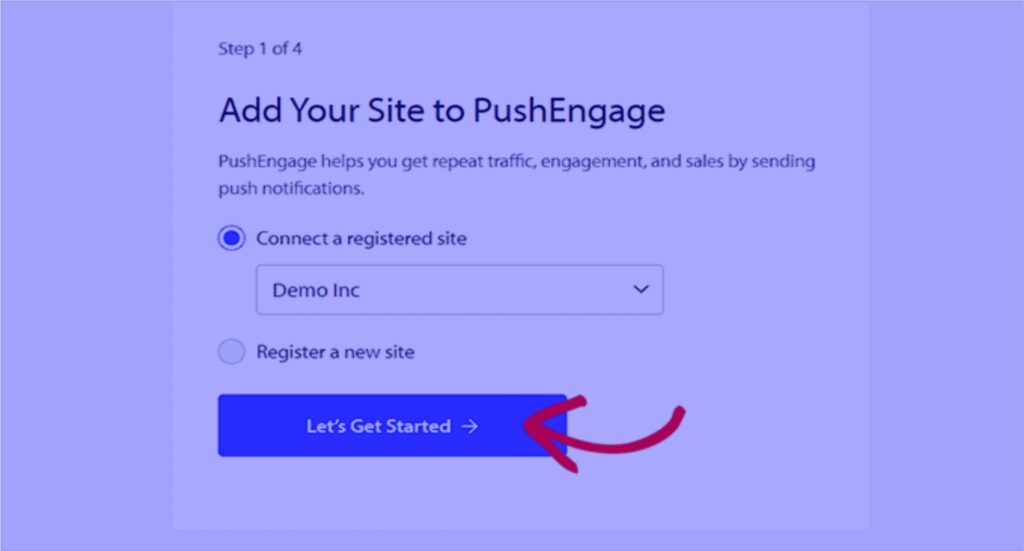
This will launch a new window with the ‘Add Your Site to PushEngage’ prompt. Make sure the website registered with PushEngage is the same one you are currently utilizing.
Simply click the “Let’s Get Started” button after that.
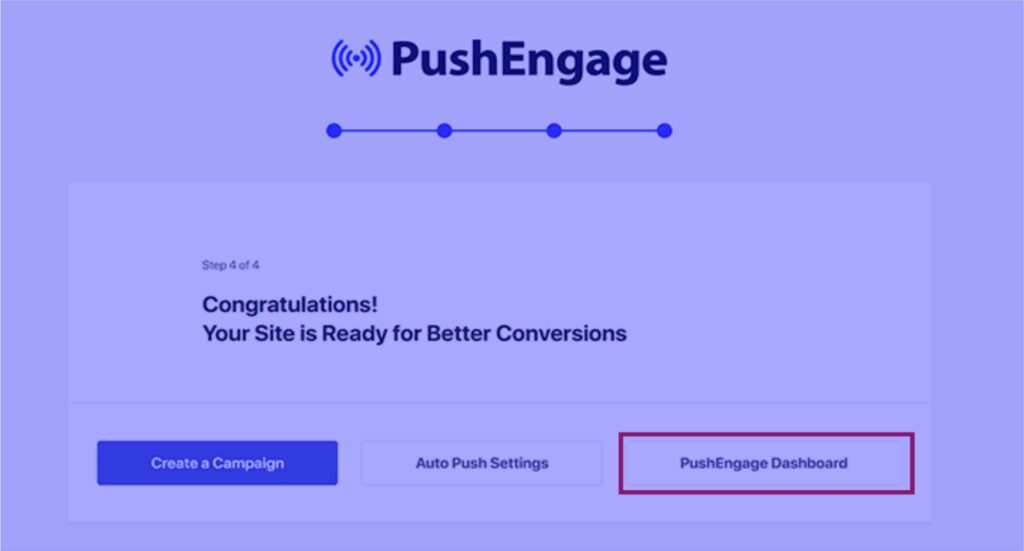
Once your PushEngage account and WordPress are linked, a setup wizard will open on your screen that you may customize as you see fit.
When finished, simply click the “PushEngage Dashboard” button to go to your WordPress dashboard.
Your WordPress blog or website needs a web push notification, so it’s time for you to start building one.
Step 3: Setting Up Your Push Notification Messages
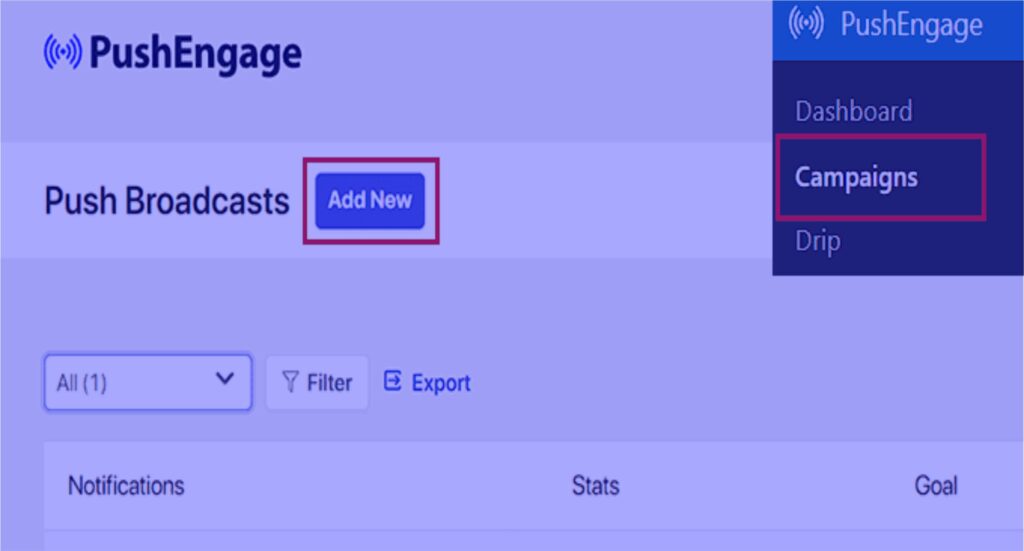
Go to the PushEngage » Campaigns tab and select the ‘Add New’ button to start creating a push notification.
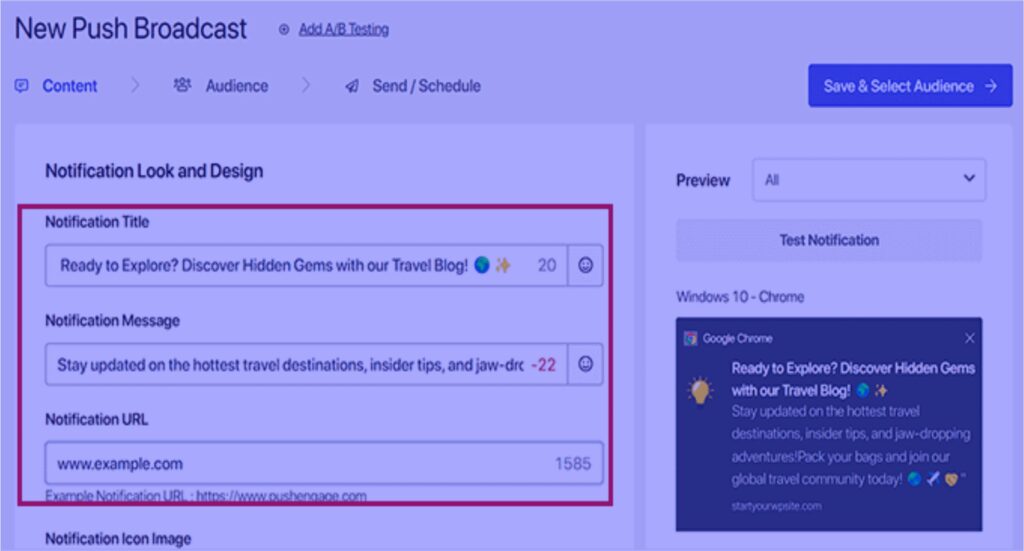
This will take you to your WordPress dashboard’s ‘Create New Push Broadcast’ screen.
The ‘Notification Title’ section is where you can begin by entering a name for your push notification. Then, in the ‘Message’ section, type the message you wish to appear in the push notification.
The ‘Notification URL’ column must then contain the URL of your website.
The preview of your push notification will appear in the right corner of the screen once you input the title and message.
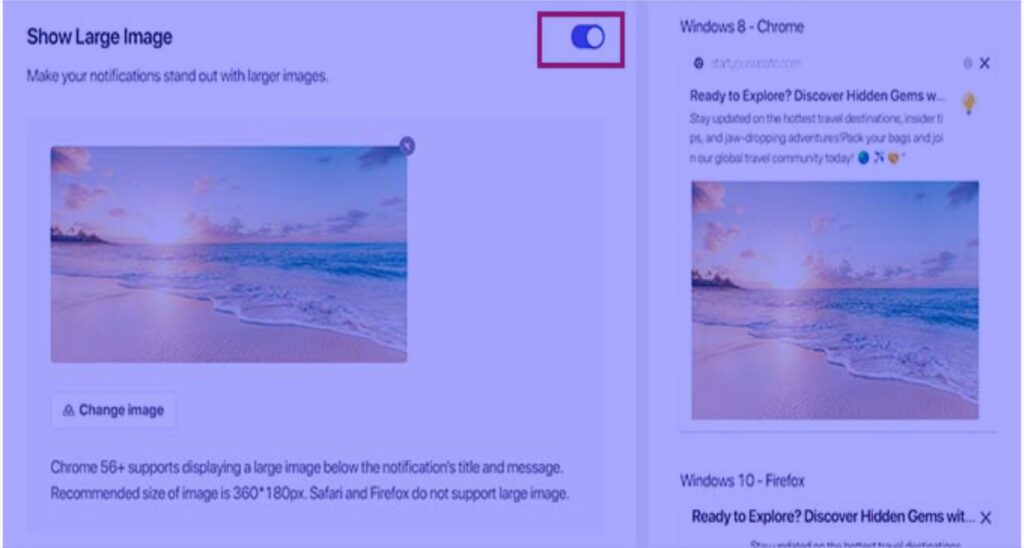
If you wish to include a picture in your push notification, scroll down to the “Show Large Image” section and turn the switch on.
This image will appear at the top of your notice and won’t affect how the title and message are aligned.
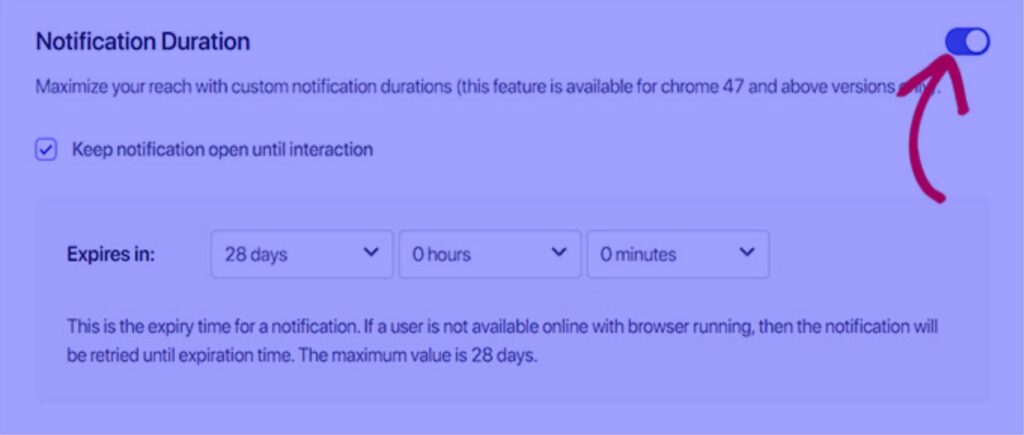
To turn the switch to active, you must then scroll down to the “Notification Duration” section.
The ‘Keep notification open until interaction’ option is now available after you’ve completed that. Unless the user responds to the notification, it will be shown continuously.
From the dropdown choices, you can also alter the length of your push notice. The push notification’s display time is managed by this setting.
Remember that these capabilities are only compatible with Chrome 47 and later; other browsers are not supported.
Simply click the ‘Save & Select Audience’ option at the top after configuring the settings.
Also Read: how to disable right-clicking on WordPress Website
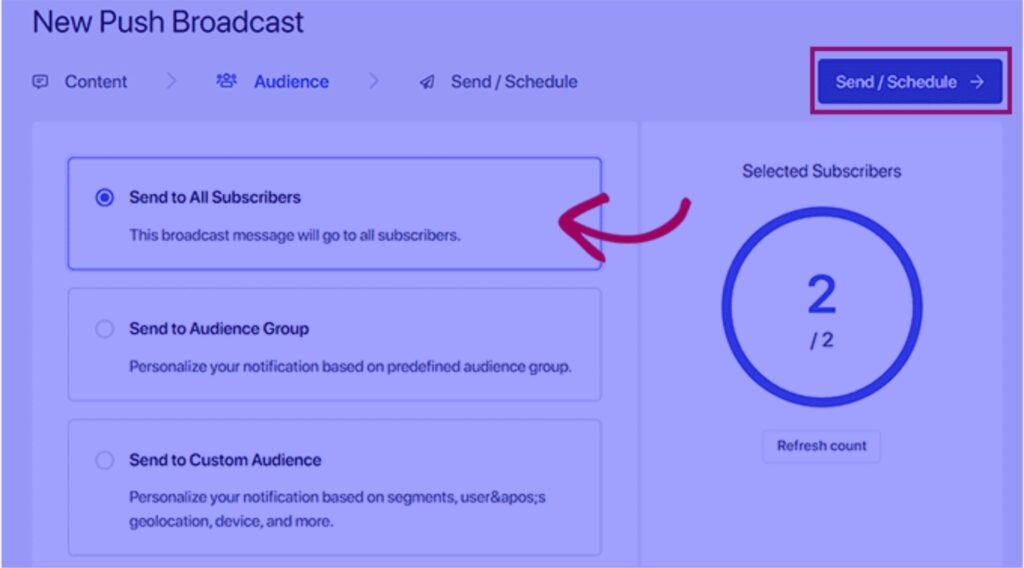
You must then choose the audience to which you wish to deliver push notifications in the following phase, which is directed by this.
Here, we’ll select the ‘Send to All Subscribers’ option to ensure that every subscriber sees our push message.
To continue, click the ‘Send/Schedule’ option at the top.
You must schedule the timing of your web push notification in the following step.
For instance, you can choose the “Begin sending immediately” option if you wish to start delivering push notifications right away. You can, however, choose a certain time for your notification to be issued, or you can make it a periodic push notification.
However, bear in mind that to access these two capabilities, you must subscribe to PushEngage’s subscription plan.
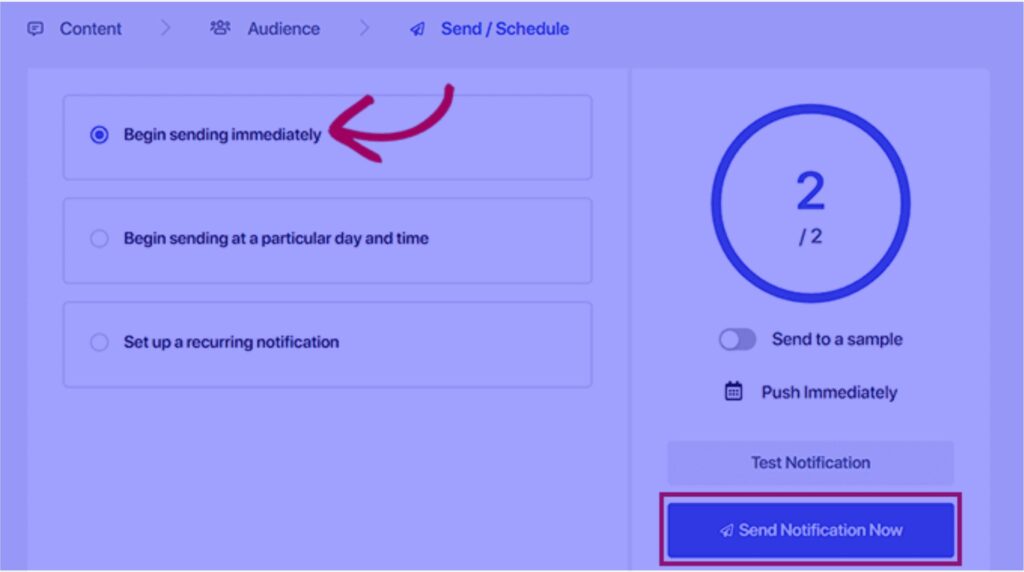
In order to save your campaign and begin sending your web push notifications, click the ‘Send Notification Now’ button at the end.
It’s recommended practice to verify that push notifications are functioning as intended after you’ve put them up.
Open your website on a PC or mobile device to test your push alerts. The online push notice you just made ought to appear right away here.
Ours is seen below on a desktop computer:
However, bear in mind that only users on your PushEngage subscriber list will see this web push notice.
Create a Subscribers List With PushEngage
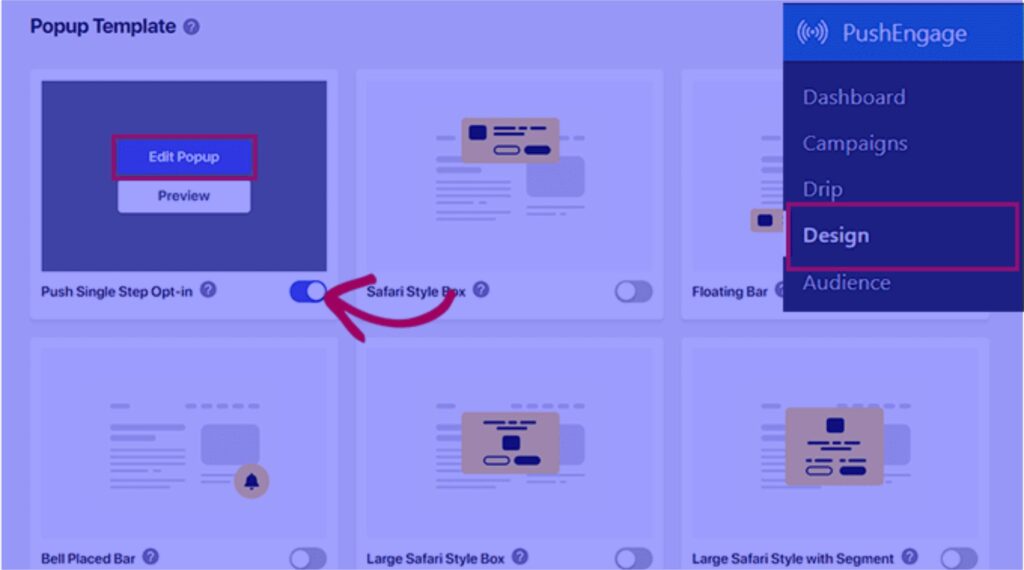
You must access the PushEngage » Design page from the WordPress admin sidebar if your PushEngage account does not already have a subscribers list.
When you are there, just turn the switch for the popup template you want on. Next, select “Edit Popup” from the menu.
By doing this, a new page with the PushEngage website dashboard will open.
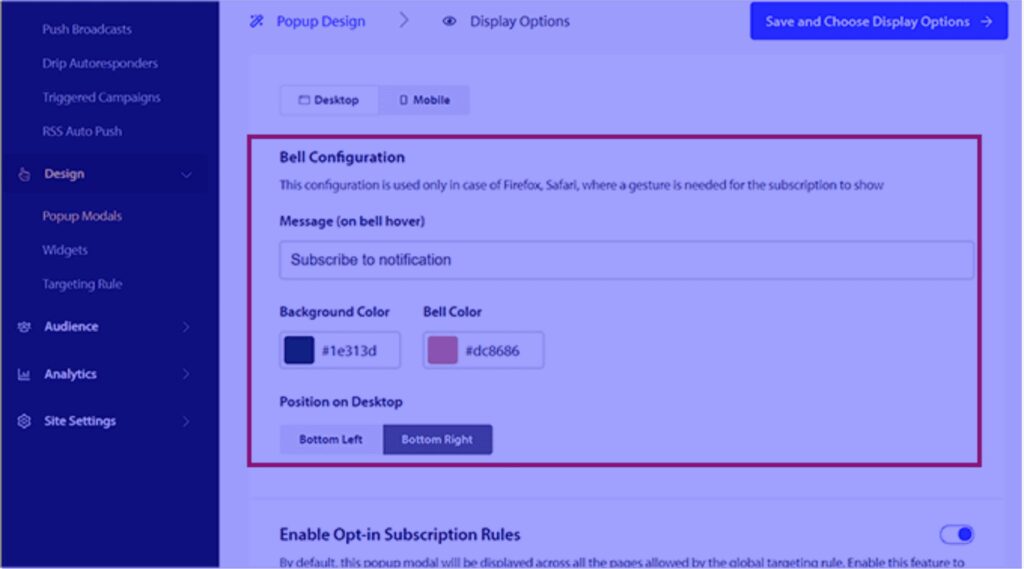
From this point, you may set your popup’s layout, message, and subscription restrictions.
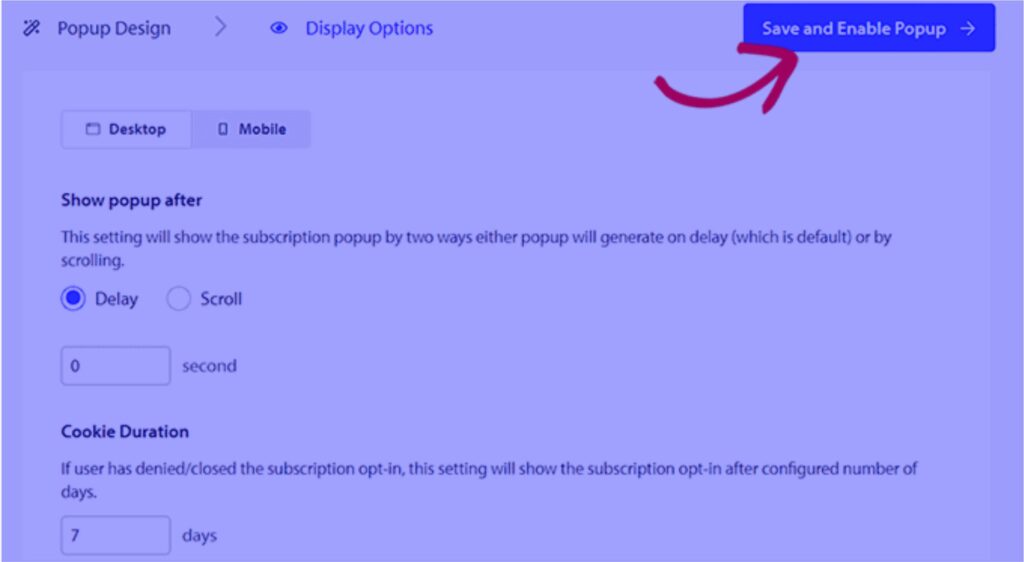
Don’t forget to click the ‘Save & Choose Display Options’ button at the top when you are finished.
Your display choices will now be displayed, allowing you to select the cookie duration, turn on the subscription trigger, and more.
To save your changes and start the popup, finally click the ‘Save and Enable Popup’ option.
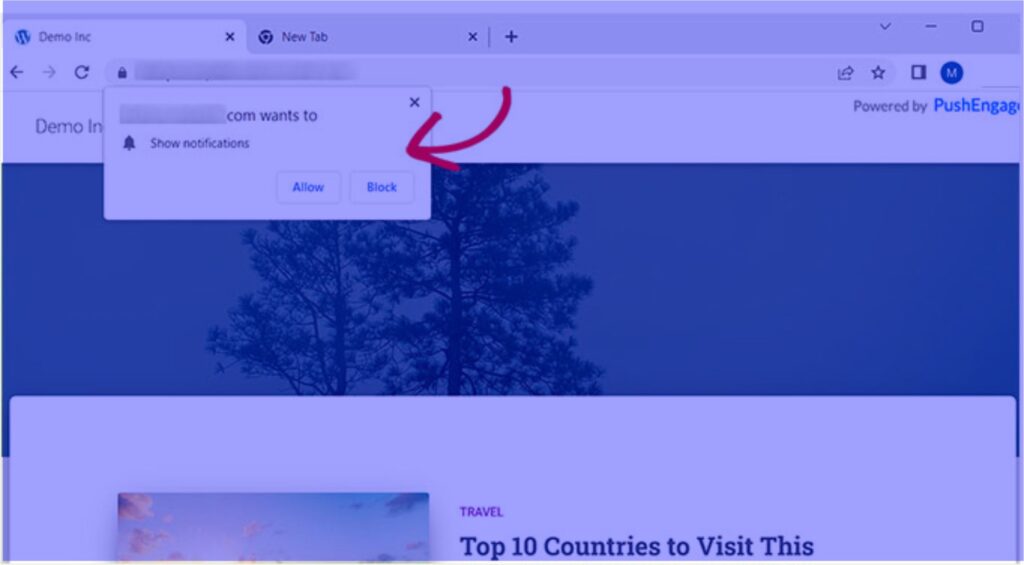
You must now access your website using a different Google account. A popup will appear at the top of your page asking visitors if they want to allow notifications to be displayed.
The users will now instantly be added to your PushEngage subscriber list after they click the “Allow” button.
Send Push Notifications to Subscribers Every Time You Publish a New Post on WordPress
You may use PushEngage to notify subscribers via push notifications each time a new WordPress blog post is published.
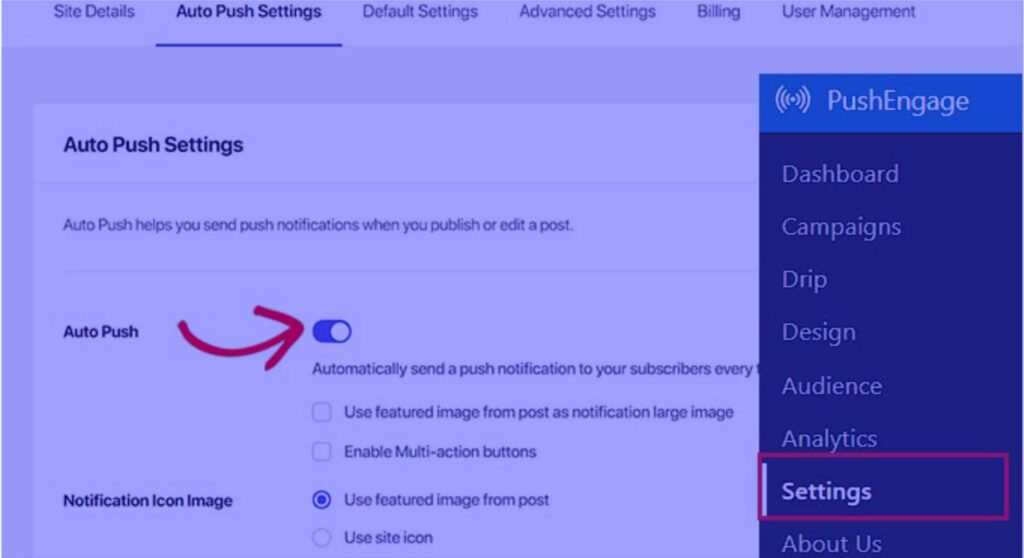
To achieve this, navigate to the ‘Auto Push Settings’ tab on the PushEngage » Settings page from the WordPress dashboard. Toggle the “Auto Push” switch to active from here.
The featured image for the post must then be displayed in the push notification, and multi-action buttons must be enabled.
You may give consumers various options to respond to your push notifications using multi-action buttons, such as allowing them to visit your blog, subscribe to your YouTube channel, or sign up for your email newsletter.
The site icon or the featured image from the blog post may also be used as the image for the notification icon.
To save your settings, click the ‘Save Changes’ button at the end of the process.
Scroll down to the “PushEngage Push Notifications Settings” section after creating a new article in the WordPress block editor.
From this point, you may give your web push notification a title, a message, and even a target audience.

To save your changes and publish your post, just click the “Publish” button when you are finished.
Your website’s new blog article will now be announced to your subscribers.